FineTuning using Ludwig
Fine-tuning allows the adaptation of pre-trained LLMs to a specific task by updating model weights, leading to performance improvements. It is a means to personalize these general models for specialized applications, optimizing performance for unique tasks.
1. Traditional FineTuning Vs. Parameter Efficient FineTuning
Traditional fine-tuning involves updating all model parameters, a process proven to be resource-intensive, time-consuming, and not always yield optimal task-specific performance. However, recent innovations in parameter-efficient fine-tuning have offered a breakthrough. By freezing the pre-trained LLM and only training a very small set of task-specific layers—less than 1% of the total model weight—efficient fine-tuning proves to be both resource-friendly and more effective.
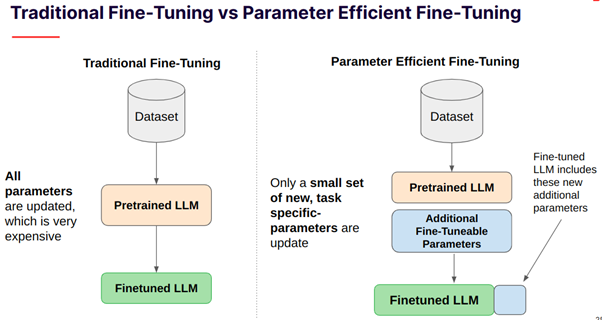
Traditional FineTuning Vs. Parameter Efficient FineTuning.
1. Fine-tuning using Ludwig
Ludwig offers a declarative approach to machine learning, providing an accessible interface to control and customize models without extensive coding. Its YAML-based configurations empower users to manage different input features and output tasks efficiently. Imagine a world where we feed the model a prompt, pair it with specific instructions and context, and let the magic happen. The prompt acts as a guide, steering the model’s understanding of the task at hand. And this is where Ludwig’s advanced features come into play.
Attention
This toolkit a single memory-contrained GPU, including: LoRA and 4-bit quantization.
Now, let’s delve deeper into the nitty-gritty of advanced configuration and the fine-tuning parameters that Ludwig offers.
1.2. Import The Code Generation Dataset
from google.colab import data_table; data_table.enable_dataframe_formatter()
import numpy as np; np.random.seed(123)
import pandas as pd

df = dataset['train'].to_pandas()

# We're going to create a new column called `split` where:
# 90% will be assigned a value of 0 -> train set
# 5% will be assigned a value of 1 -> validation set
# 5% will be assigned a value of 2 -> test set
# Calculate the number of rows for each split value
total_rows = len(df)
split_0_count = int(total_rows * 0.9)
split_1_count = int(total_rows * 0.05)
split_2_count = total_rows - split_0_count - split_1_count

# Create an array with split values based on the counts
split_values = np.concatenate([
    np.zeros(split_0_count),
    np.ones(split_1_count),
    np.full(split_2_count, 2)
])

# Shuffle the array to ensure randomness
np.random.shuffle(split_values)

# Add the 'split' column to the DataFrame
df['split'] = split_values
df['split'] = df['split'].astype(int)

n_rows = 5000
df = df.head(n=n_rows)
Understanding The Code Alpaca Dataset
df.head(10)
This is how the dataset looks like:

A look at the Code Alpaca dataset.
This dataset is meant to train a large language model to following instructions to produce code from natural language. Each row in the dataset consists of an:
instruction that describes a task
input when additional context is required for the instruction, and
the expected output.
This is a script that calculates various statistics for token distributions in different columns of a DataFrame.
from transformers import AutoTokenizer
import numpy as np

def calculate_distribution(data_dict):
    result = {}

    for key, values in data_dict.items():
        values = np.array(values)
        result[key] = {
            'average': int(np.mean(values)),
            'min': np.min(values),
            'max': np.max(values),
            'median': np.median(values),
            '75th_percentile': int(np.percentile(values, 75)),
            '90th_percentile': int(np.percentile(values, 90)),
            '95th_percentile': int(np.percentile(values, 95)),
            '99th_percentile': int(np.percentile(values, 99))
        }

    return result

tokenizer = AutoTokenizer.from_pretrained('HuggingFaceH4/zephyr-7b-beta')

token_counts = {
    "instruction": [],
    "input": [],
    "output": [],
    "total": []
}

for index, row in df.iterrows():
    instruction_col_tokens = len(tokenizer.tokenize(row['instruction']))
    input_col_tokens = len(tokenizer.tokenize(row['input']))
    output_col_tokens = len(tokenizer.tokenize(row['output']))
    total = instruction_col_tokens + input_col_tokens + output_col_tokens

    token_counts['instruction'].append(instruction_col_tokens)
    token_counts['input'].append(input_col_tokens)
    token_counts['output'].append(output_col_tokens)
    token_counts['total'].append(total)

token_distribution = calculate_distribution(token_counts)
token_distribution = pd.DataFrame(token_distribution)
token_distribution
1.3. Setup Your HuggingFace Token 🤗
pip install --upgrade git+https://github.com/huggingface/peft.git --quiet
import getpass
import locale; locale.getpreferredencoding = lambda: "UTF-8"
import logging
import os
import torch
import yaml

from ludwig.api import LudwigModel

os.environ["HUGGING_FACE_HUB_TOKEN"] = "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"
assert os.environ["HUGGING_FACE_HUB_TOKEN"]
1.4. Fine-tuning
Note
We’re going to fine-tune using a single T4 GPU with 16GiB of GPU VRAM on Colab. To do this, the new parameters we’re introducing are:
adapter: The PEFT method we want to use
quantization: Load the weights in int4 or int8 to reduce memory overhead.
trainer: We enable the finetune trainer and can configure a variety of training parameters such as epochs and learning rate.
qlora_fine_tuning_config = yaml.safe_load(
"""
model_type: llm
# We use a resharded model here since the base model does not have safetensors support.
base_model: HuggingFaceH4/zephyr-7b-beta

input_features:
- name: instruction
    type: text

output_features:
- name: output
    type: text

prompt:
template: >-
    Below is an instruction that describes a task, paired with an input
    that may provide further context. Write a response that appropriately
    completes the request.

    ### Instruction: {instruction}

    ### Input: {input}

    ### Response:

generation:
temperature: 0.1
max_new_tokens: 256

adapter:
type: lora

quantization:
bits: 4

preprocessing:
global_max_sequence_length: 256
split:
    type: random
    probabilities:
    - 0.9 # train
    - 0.05 # val
    - 0.05 # test

trainer:
type: finetune
epochs: 1
batch_size: 1
eval_batch_size: 2
gradient_accumulation_steps: 16
learning_rate: 0.0004
learning_rate_scheduler:
    warmup_fraction: 0.03
"""
)

model = LudwigModel(config=qlora_fine_tuning_config, logging_level=logging.INFO)
results = model.train(dataset=df)
Perform Inference We can now use the model we fine-tuned above to make predictions on some test examples to see whether fine-tuning the large language model improve its ability to follow instructions/the tasks we’re asking it to perform.
df[['instruction', 'input']].iloc[-n_rows:].shape
test_df = df[['instruction', 'input']].iloc[-n_rows:]
test_df = test_df.head(20)
predictions = model.predict(test_df)[0]
result_df = test_df.copy()
result_df['Output'] = df['output'].iloc[-n_rows: -n_rows + test_df.shape[0]].values
result_df['Generated_output'] = predictions['output_response']
result_df
This is how the dataset looks like:

A look at the dataset with the generated output.
Note
he inference outputs may not be perfect, especially if the fine-tuning epochs are limited. However, by tweaking parameters like generation configuration (temperature, maximum new tokens, etc.), the outputs can be altered, thereby refining the model’s responses.